How can I use Wolfram MCP Service as a remote MCP server?
Wolfram MCP Service enables MCP-compatible AI applications to access Wolfram|Alpha, Wolfram Language and the Wolfram Knowledgebase using the Model Context Protocol (MCP).
Most clients can connect and authenticate directly with Wolfram MCP Service. This article provides setup instructions for an important selection of these.
Some legacy clients may not support a direct connection to a remote server with authentication. For these clients, use the Wolfram Local MCP Bridge application to access the features of Wolfram MCP Service.
Authenticating in the Remote MCP Server
The following information will be needed to configure your client to communicate with Wolfram MCP Service. Use this in conjunction with the specific instructions for your chosen client below to enable access.
Server URL
https://services.wolfram.com/api/mcpAuthentication Method
Authentication is currently supported via HTTP headers only.
The following header is required for every request sent to the remote MCP server:
Authorization: Bearer <YOUR_WOLFRAM_MCP_SERVICE_API_KEY>
where <YOUR_WOLFRAM_MCP_SERVICE_API_KEY> denotes the API key associated with your Wolfram MCP Service subscription.
Configuring the Client
Specific instructions for configuring your client are provided for:
If you do not see your client here, check your client’s documentation for directions on connecting to a remote MCP service.
Some legacy clients may not support a remote connection with authentication headers. For those, use the Wolfram Local MCP Bridge application to access the features of the Wolfram MCP Service.
Antigravity
- Open Antigravity.
- Open the MCP store via the “…” drop-down at the top of the editor’s agent panel.
- Click Manage MCP Servers.
- Click View raw config.
- Modify the
mcp_config.jsonwith your custom MCP server configuration.
{
  "mcpServers": {
    "wolfram": {
      "serverUrl": "https://services.wolfram.com/api/mcp",
      "headers": {
        "Authorization": "Bearer <YOUR_WOLFRAM_MCP_SERVICE_API_KEY>",
        "Content-Type": "application/json"
      }
    }
  }
}
Claude Desktop
- Open Claude Desktop.
- Go to Settings.
- Select Developer.
- Edit the MCP configuration file.
- Add the following configuration and save the file.
{
  "mcpServers": {
    "wolfram": {
      "command": "C:\\Progra~1\\nodejs\\npx.cmd",
      "args": [
        "-y",
        "mcp-remote@latest",
        "https://services.wolfram.com/api/mcp",
        "--header",
        "Authorization: Bearer ${WOLFRAM_API_KEY}"
      ],
      "env": {
        "WOLFRAM_API_KEY": "<YOUR_WOLFRAM_MCP_SERVICE_API_KEY>"
      }
    }
  }
}
Cline
- Open Cline in VS Code.
- Click MCP Servers.
- Select the Remote Servers tab.
- Click the Edit Configuration button.
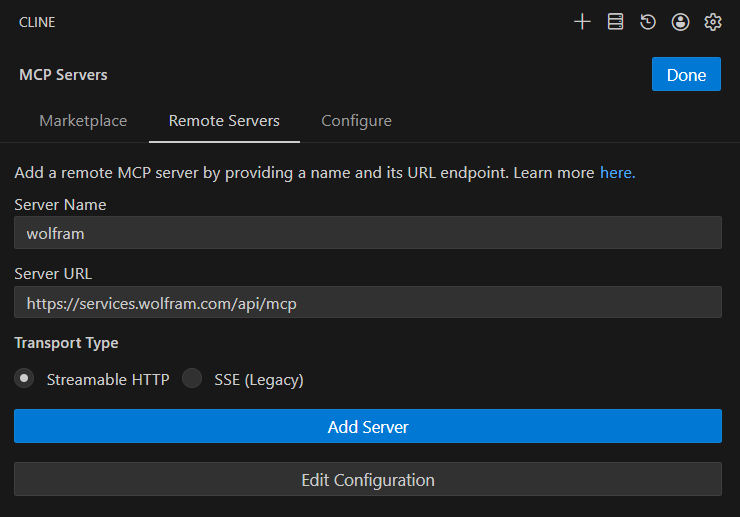
- Add the following configuration and save the file.
{
"mcpServers": {
"wolfram": {
"disabled": false,
"timeout": 30,
"type": "stdio",
"command": "npx",
"args": [
"mcp-remote",
"https://services.wolfram.com/api/mcp",
"--header",
"Authorization: Bearer ${WOLFRAM_API_KEY}"
],
"env": {
"WOLFRAM_API_KEY": "<YOUR_WOLFRAM_MCP_SERVICE_API_KEY>"
},
"autoApprove": []
}
}
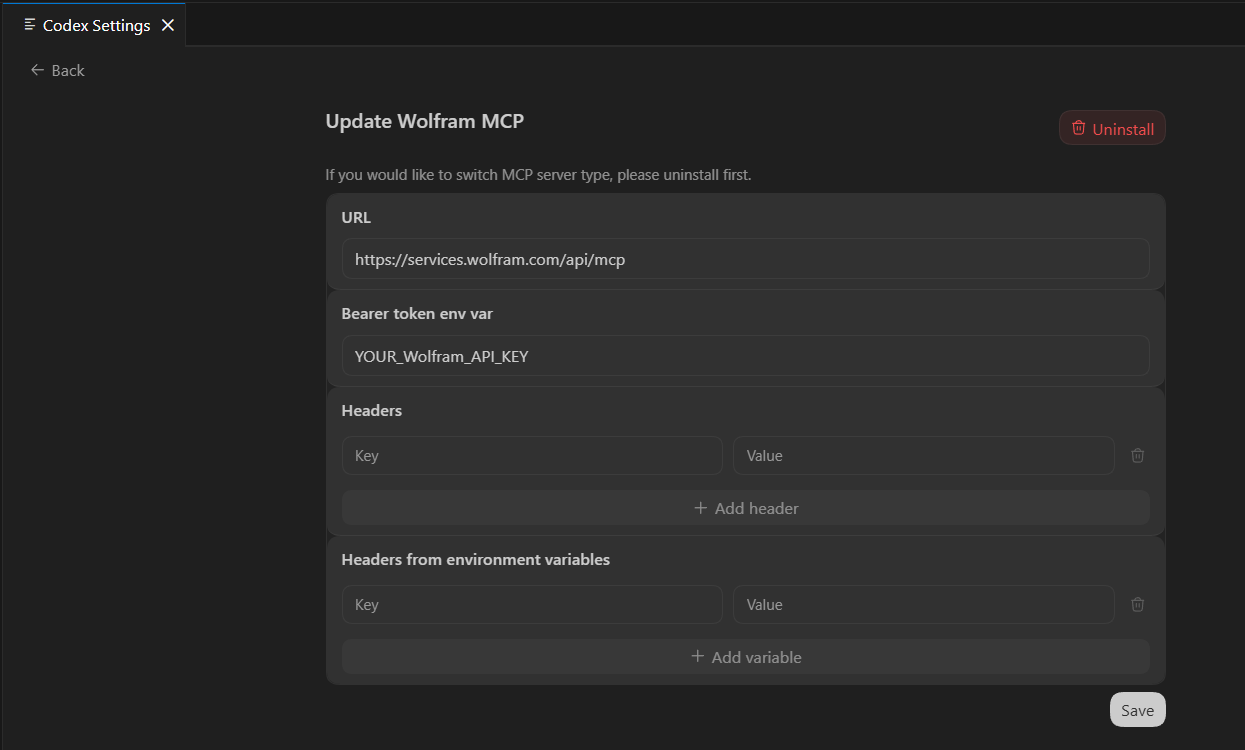
}Codex
- Open Codex in VS Code.
- Go to Settings, then open the MCP Settings section.
- Add the following configuration and save the changes.
Continue
- Open Continue in VS Code.
- Navigate to the
.continue/mcpServersdirectory in your user home folder. - Add the following configuration and save the YAML file.
name: Wolfram MCP
version: 0.0.1
schema: v1
mcpServers:
  - name: Wolfram
    command: npx
    args:
      - "-y"
      - "mcp-remote@latest"
      - "https://services.wolfram.com/api/mcp"
      - "--header"
      - "Authorization: Bearer <YOUR_WOLFRAM_MCP_SERVICE_API_KEY>"
Cursor
- Open Cursor.
- Click Tools & MCP.
- Click New MCP Server.
- Add the following configuration and save.
{
"mcpServers": {
"wolfram": {
"url": "https://services.wolfram.com/api/mcp",
"headers": {
"Authorization": "Bearer <YOUR_WOLFRAM_MCP_SERVICE_API_KEY>"
}
}
}
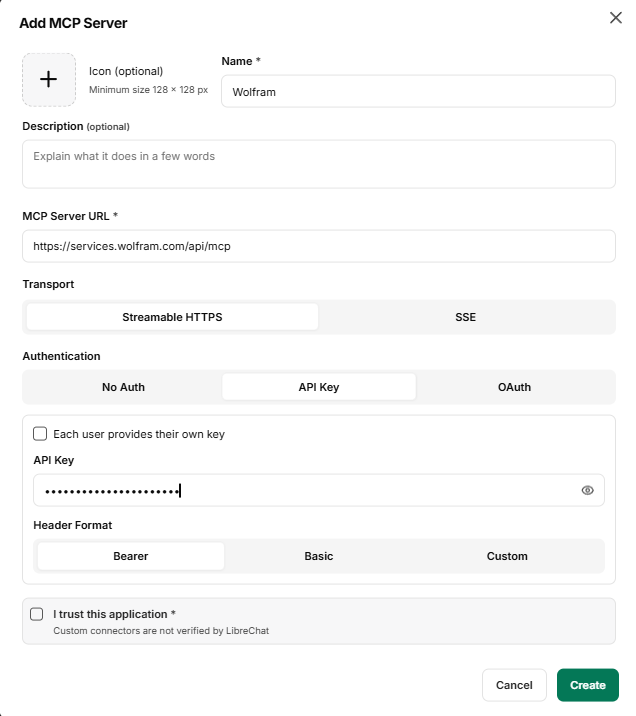
}LibreChat
- Open LibreChat.
- Open MCP Settings.
- Click the + icon to add a new MCP server.
- Enter the following configuration details as shown.
- Enable I trust this application.
- Click Create to save the configuration.
Name: Wolfram
MCP Server URL: https://services.wolfram.com/api/mcp
Transport: Streamable HTTPS
Authentication: API Key
API Key: <YOUR_WOLFRAM_MCP_SERVICE_API_KEY>
Header Format: Bearer
OpenCode
- Navigate to
%USERPROFILE%\.config\opencode\opencode.jsonc. - Edit the configuration file.
- Add the following Wolfram MCP configuration.
- Save the file.
- Restart OpenCode.
- Verify that the server appears in the MCP tab under Status.
{
  "$schema": "https://opencode.ai/config.json",
  "mcp": {
    "wolfram": {
      "type": "remote",
      "url": "https://services.wolfram.com/api/mcp",
      "enabled": true,
      "oauth": false,
      "headers": {
        "Authorization": "Bearer <YOUR_WOLFRAM_MCP_SERVICE_API_KEY>"
      }
    }
  }
}Windsurf
- Open Windsurf.
- Navigate to
%USERPROFILE%\.codeium\windsurf\mcp_config.json. - Add the following configuration and save the file.
{
  "mcpServers": {
    "wolfram": {
      "command": "npx",
      "args": [
        "mcp-remote",
        "https://services.wolfram.com/api/mcp",
        "--header",
        "Authorization: Bearer ${WOLFRAM_API_KEY}"
      ],
      "env": {
        "WOLFRAM_API_KEY": "<YOUR_WOLFRAM_MCP_SERVICE_API_KEY>"
      }
    }
  }
}
Zed
- Open Zed.
- Open the Agent Panel.
- Click MCP Servers.
- Select Add Custom Server….
- Add the following configuration and save the changes.
{
  "wolfram": {
    "command": "C:\\Progra~1\\nodejs\\npx.cmd",
    "args": [
      "-y",
      "mcp-remote@latest",
      "https://services.wolfram.com/api/mcp",
      "--header",
      "Authorization: Bearer ${WOLFRAM_API_KEY}"
    ],
    "env": {
      "WOLFRAM_API_KEY": "<YOUR_WOLFRAM_MCP_SERVICE_API_KEY>"
    }
  }
}Contact Support
Whether you have a question about billing, activation or something more technical, we are ready to help you.
1-800-WOLFRAM (+1-217-398-0700 for international callers)
Customer Support
Monday–Friday
8am–5pm US Central Time
- Product registration or activation
- Pre-sales information and ordering
- Help with installation and first launch
Advanced Technical Support (for eligible customers)
Monday–Thursday
8am–5pm US Central Time
Friday
8:30–10am & 11am–5pm US Central Time
- Priority technical support
- Product assistance from Wolfram experts
- Help with Wolfram Language programming
- Advanced installation support