How do I set up gridMathematica Server with the Lightweight Grid Manager on macOS?
In order to set up gridMathematica Server, we will
- Install gridMathematica Server on a compute node, then
- Activate the gridMathematica Server’s license and
- Test a gridMathematica kernel.
Install gridMathematica Server on a Compute Node
- Log in to your machine using an account that has administrative privileges.
- Quit any previous installations of Wolfram products that are running on your machine.
- If you already have an older gridMathematica Server installed in your Applications folder, uninstall the previous application.
- Installing from a downloaded file: Double-click the icon to start the installation.
Installing from a DVD or a USB drive: Insert the DVD or connect the USB drive to your computer.The gridMathematica Server installer window appears.

- Double-click the icon to start installation. The Install gridMathematica Server dialog appears.

- Click Continue to begin the installation process. The Destination Select step proceeds automatically. The Installation Type step appears next.

- Click Install to proceed. A dialog window appears.

- Enter the user account credentials and click Install Software to continue. The installation starts.

The gridMathematica Server Configuration dialog window appears. Note that it may be hidden behind other active windows.

- Click OK to continue. The User Account description dialog window appears.

- Click Continue. The user account selection dialog window appears.

-
Select Local to create a new local user account. Click OK to continue.
The Select New User dialog appears.

-
We recommend “wolframgrid” as the name for the local user account. Click OK to confirm your selection.
The User Account Password dialog window appears.

-
Choose and enter a password for this new Local User Account. Click OK to continue. Confirm the Local User Account password.
A dialog window appears, indicating that the account was created.
- Click OK to continue. The Web Interface Admin Account dialog window appears.

-
Choose and enter a password for the web interface that configures the Apache Tomcat server. Choose a password and click OK to continue. Confirm the web interface admin password.
The installation is now complete.

- Close this dialog window by clicking Close. An Installation Complete dialog window opens.

- Click Finish. The web interface launches automatically. We will return to the web interface when testing a gridMathematica kernel.
Activation/Licensing
- Open the Finder.
- Navigate to the Applications directory.
- Hold the Control key and click gridMathematicaServer.app.
- Select Show Package Contents.
- Navigate to Contents ► macOS.
- Start the Mathematica component of gridMathematica Server by double-clicking Mathematica. A terminal window opens in order to start the application, then the Welcome to Wolfram Mathematica window appears.
- Activate gridMathematica Server.
- Close the terminal.
Activation of gridMathematica Server is now complete.
Test a gridMathematica Kernel
- Return to the web browser from the end of the Installation section, or open a web browser and navigate to localhost:3737. The main Status page appears.

-
The left panel indicates any gridMathematica Servers visible on the local network, including the one that was just installed.
Navigate to Kernel Settings ► Services.

- Click the Open Kernel link to open a kernel. A warning message appears.

- Confirm the warning message by clicking OK. A Wolfram kernel attempts to start.
- Wait for the Wolfram kernel to initialize. A connection status appears.
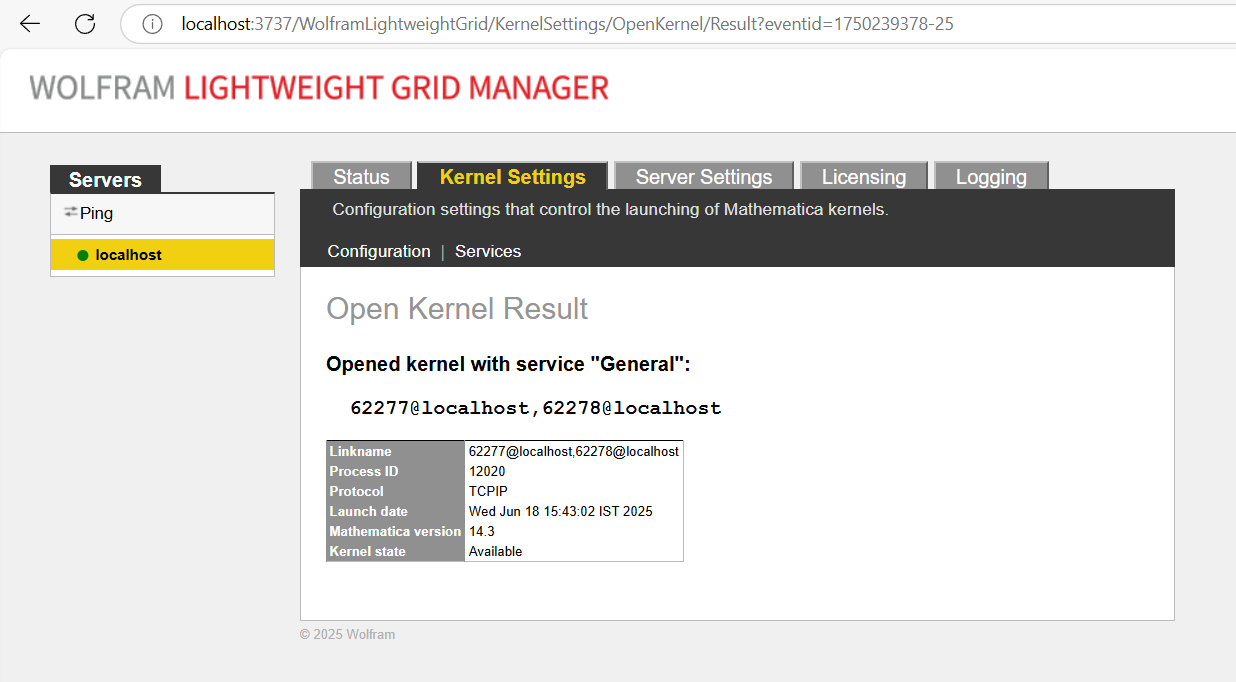
- Verify that the kernel state is Available.
The configuration of the Lightweight Grid Manager is now complete and tested.
[English]
1-800-WOLFRAM (+1-217-398-0700 美国境外用户)
客服支持
周一至周五
8am–5pm 美国中部时区
- 产品注册或激活
- 预售信息和订单
- 安装帮助和首次启动
高级技术支持 (面向特定用户)
周一至周四
8am–7pm 美国中部时区
周五
8:30–10am & 11am–5pm 美国中部时区
- 优先技术支持
- Wolfram 专家助理专员
- Wolfram 语言编程帮助
- 高级安装支持